


Visual HTML WYSIWYG Editor Tips: Make Images Pop with Auto Enhancements

It’s no secret that most users want their uploaded photos to look good, presentable, and aesthetically pleasing. That’s why in most modern applications, especially social media platforms, users can enhance their images before uploading them. They usually do so with the help of an image editor or a WYSIWYG HTML editor with image enhancement features. And that’s nice, but what if the application can do the enhancements for them so that they won’t have to do anything but upload? In this tutorial, we’ll show you how to automatically apply image enhancements using a Visual HTML WYSIWYG editor.
Key Takeaways
- Image enhancement is an important feature for most modern applications
- Implement automatic image enhancement quickly using Froala and Filestack
- Greatly improve image quality with Filestack’s 10 different types of enhancement
- Choose between multiple presets depending on your requirements
- Use just one type of image enhancement (e.g., always upscale images) or let the user choose a preset using buttons
What is Image Enhancement?
Image enhancement refers to a process that improves the visual quality of an image. It typically involves increasing an image’s resolution, adjusting colors and shadows, and correcting parts of an image that don’t look too good. Users can usually choose which type of image enhancement they want by either adjusting the images themselves or using buttons that automatically enhance an image when clicked. Alternatively, developers can allow just one type or preset of image enhancement.
For example, let’s say we have a social media site where users share stories and photos of their travels or the outdoors. We can then configure our application to always use the “outdoor” preset instead of presenting users with different options every time. Similarly, if we’re building a platform where users can upload various types of images, we can simply let the users decide and then bind some buttons to different image enhancement presets. But how exactly do we implement this feature? In this tutorial, we’ll use Filestack, a file upload and transformation tool that supports image enhancements through simple API calls. The best part about this is that Froala (as of v4.3.0) natively comes with Filestack, meaning you can enhance images straight from your WYSIWYG editor. Before we start coding, let’s first check out the different enhancement presets available to Filestack.
Types of Image Enhancement in Froala WYSIWYG Editor
Through Filestack, Froala now supports the following types or presets of image enhancement:
- Upscale: Increase image resolution
- Auto: Automatically choose the optimal set of improvements for an image
- Vivid: Increase color depth and brightness
- Beautify: Automatically correct blemishes and color of faces in portraits of people
- Beautify Plus: Applies stronger corrections but works similarly to beautify
- Fix Dark: Corrects extremely underexposed photos
- Fix Noise: Automatically detect and remove grains from photos while preserving details
- Fix Tint: Remove abnormal tints due to cameras picking up excess green, red, blue, or yellow
- Outdoor: Optimize landscape images by adding color vibrancy and bringing out details from shadowy areas
- Fireworks: Set off excess color from fireworks while correcting grain from the night sky
Before we get started, note that Filestack’s image enhancement is a premium feature that supports images that are not larger than 10 MB.
How to Enhance Images in Froala WYSIWYG Editor
Implementing image enhancement is simple with Froala and Filestack. We’ll need an HTML in which we’ll place the editor element and a JS for initializing the editor and setting its options. First, let’s create our WYSIWYG editor.
Building the WYSIWYG Editor
Insert the following code in your HTML file:
<!DOCTYPE html>
<html lang="en">

<head>
    <meta charset="UTF-8" />
    <meta http-equiv="X-UA-Compatible" content="IE=edge" />
    <meta name="viewport" content="width=device-width, initial-scale=1.0" />

    <title>Image Enhancements Using Froala and Filestack</title>
    <link href="https://cdn.jsdelivr.net/npm/bootstrap@5.3.2/dist/css/bootstrap.min.css" rel="stylesheet" integrity="sha384-T3c6CoIi6uLrA9TneNEoa7RxnatzjcDSCmG1MXxSR1GAsXEV/Dwwykc2MPK8M2HN" crossorigin="anonymous">
    <link href="https://cdn.jsdelivr.net/npm/froala-editor@latest/css/froala_editor.pkgd.min.css" rel="stylesheet" type="text/css" />
    <link rel="stylesheet" href="https://static.filestackapi.com/transforms-ui/2.x.x/transforms.css" />
</head>

<body>
    <div class="container-fluid vh-100">
	<div class="row h-100">
            <div class="col-md-6 mx-auto my-auto">
                <div id="froala-editor"></div>
            </div>
        </div>
    </div>

    <script src="https://cdn.jsdelivr.net/npm/bootstrap@5.3.2/dist/js/bootstrap.bundle.min.js" integrity="sha384-C6RzsynM9kWDrMNeT87bh95OGNyZPhcTNXj1NW7RuBCsyN/o0jlpcV8Qyq46cDfL" crossorigin="anonymous"></script>
    <script src="https://static.filestackapi.com/filestack-js/3.32.0/filestack.min.js"></script>
    <script src="https://static.filestackapi.com/filestack-drag-and-drop-js/1.1.1/filestack-drag-and-drop.min.js"></script>
    <script src="https://static.filestackapi.com/transforms-ui/2.x.x/transforms.umd.min.js"></script>
    <script type="text/javascript" src="https://cdn.jsdelivr.net/npm/froala-editor@latest/js/froala_editor.pkgd.min.js"></script>
    <script src="js/index.js"></script>
</body>
</html>
Here, we essentially just load the required stylesheets and scripts for Froala and Filestack and then initialize the div element, where we’ll initialize Froala Editor. Afterwards, go to your JS file and add the following code:
new FroalaEditor('#froala-editor',{
    filestackOptions: {
        filestackAPI: 'YourFilestackAPIKey',
        uploadToFilestackOnly: true,
        pickerOptions: {
            accept: ['image/*'],
            fromSources: ['local_file_system']
        }
    },
    toolbarButtons: {
        'moreRich': {
            'buttons': ['openFilePickerImageOnly', 'insertLink', 'insertTable', 'emoticons', 'specialCharacters', 'insertHR'],
            'buttonsVisible': 3
        },

        'moreText': {
            'buttons': ['bold', 'italic', 'underline', 'fontFamily', 'fontSize', 'textColor', 'backgroundColor', 'clearFormatting']
        },

        'moreParagraph': {
            'buttons': ['alignLeft', 'alignCenter', 'formatOLSimple', 'alignRight', 'alignJustify', 'formatOL', 'formatUL', 'paragraphFormat', 'paragraphStyle', 'lineHeight', 'outdent', 'indent', 'quote']
        },
        'moreMisc': {
            'buttons': ['undo', 'redo', 'fullscreen', 'selectAll', 'html', 'help'],
            'align': 'right',
            'buttonsVisible': 2
        }
    },
    events: {
        'filestack.uploadedToFilestack': function (response) {
            const originalFileHandle = response.filesUploaded[0].handle;
            const enhancedFileURL = `https://cdn.filestackcontent.com/enhance=preset:vivid/${originalFileHandle}`;
            const editor = FroalaEditor.INSTANCES[0];
            editor.image.insert(enhancedFileURL, true, { link: enhancedFileURL, alt: 'Enhanced Image' });
        },
        'filestack.uploadFailedToFilestack': function (response) {
            console.log(response);
        },
    },
    heightMin: 500,
    heightMax: 1000
});
In our JS, we create a new FroalaEditor object in our div element. For our filestackOptions, we declare our API key (get your free Filestack API Key here), allow uploads only to Filestack, and accept all types of images from the local file system. What’s more important here is the ‘filestack.uploadedToFilestack‘ event, which is where we perform the automatic image enhancements. After getting the Filestack handle of the uploaded file, we call the Filestack API that corresponds to the enhancement preset that we want. In this code, we’re using the “vivid” one, but we’ll replace this later on to test out some of the other presets, so take note of this line of code. Afterwards, we insert the enhanced image back into the editor. With this, we’re done with our implementation. Let’s now run the application and check some of the presets that Filestack offers.
Trying out Different Image Enhancement Presets within the Editor
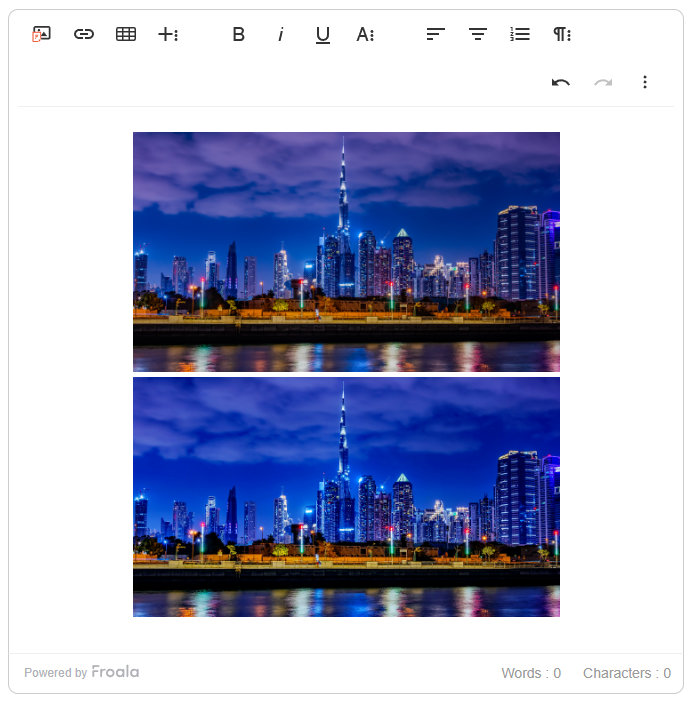
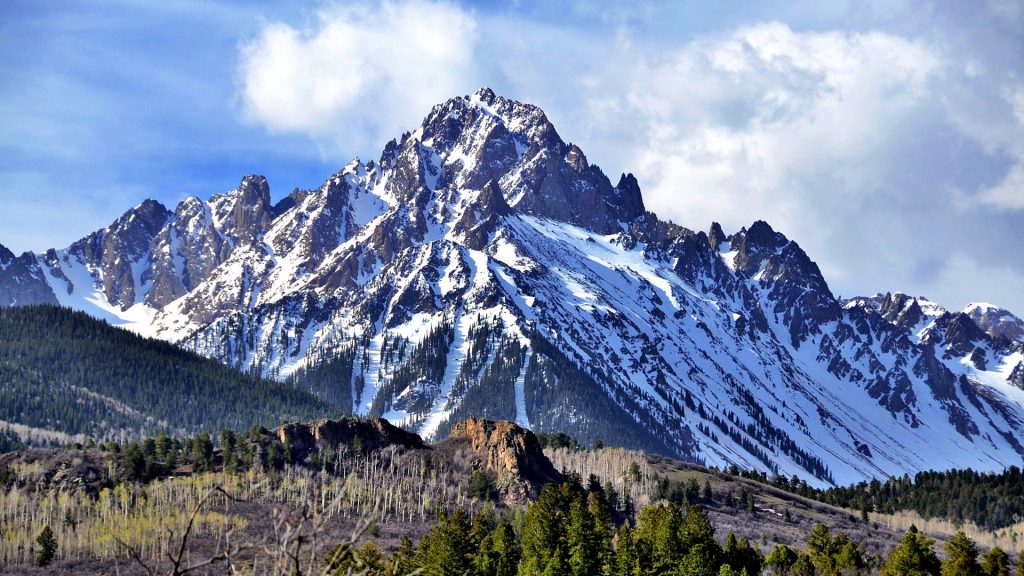
- Auto: Let’s start by using the “auto” preset. For this, we’ll use the “enhance=preset:auto” CDN from Filestack. When you run the application and upload an image, you should see the resulting screen (shown below). The image above is the original photo, while the image below is the enhanced version. Upon inspection, the enhanced image now looks even better than before with its more vibrant blue hues, better contrast, and overall livelier feeling.
- Fix Dark: enhance=preset:fix_dark
- Original image

-
- Enhanced version

- Fix Noise: enhance=preset:fix_noise
-
- Original image
-
- Enhanced version
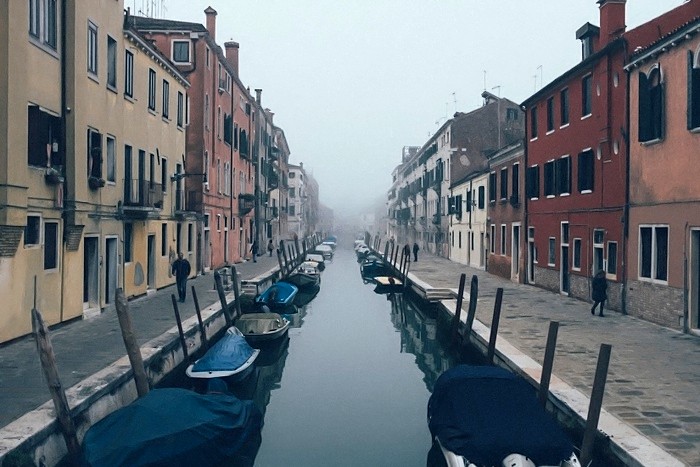
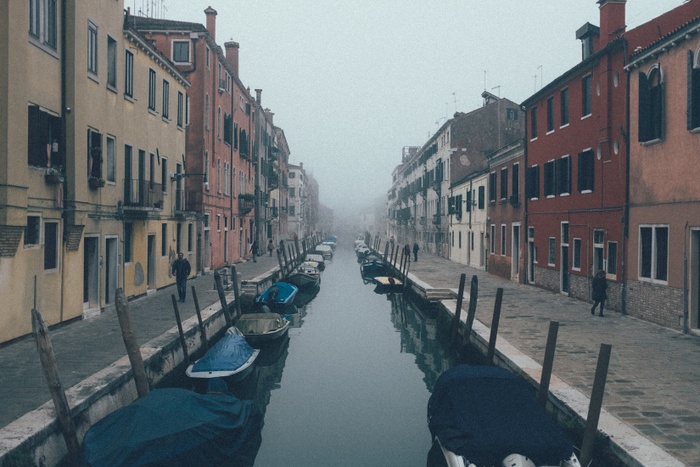
- Outdoor: enhance=preset:outdoor
-
- Original image

-
- Enhanced version
- Fireworks: enhance=preset:fireworks
-
- Original image

-
- Enhanced version

It’s clear from these examples that the images, although already good, now look even better after undergoing Filestack’s enhancements. And it didn’t even require a lot of time or coding. With Froala and Filestack, you can do the same to your users’ image uploads, boosting user experience and content quality.
Conclusion
Image enhancement doesn’t have to be a manual or time-consuming process. By using a solid WYSIWYG editor that natively supports powerful image enhancement features, you can improve image quality seamlessly. Whether it’s upscaling resolution, fixing underexposed shots, or adding life to outdoor photos, image enhancement ensures that your users’ content always looks its best. Using Froala and Filestack, we demonstrated how you can quickly implement image enhancement in your application. How you implement it (e.g., whether you’ll automatically enhance photos right away or let users decide) is up to you. Either way, you should definitely experiment with Filestack’s enhancement presets and determine what you need. Your users deserve stunning visuals—why not make it happen with a few lines of code?
Get your Filestack API here for free.


No comment yet, add your voice below!