


Generate Tags from Images with Angular 19 and Froala WYSIWYG Editor

An old adage states that “a picture is worth a thousand words.” Even today, at the advent of AI, that saying still holds true. What’s more, technology can now help us describe an image through words using image tagging. This process involves AI recognizing patterns in an image and generating human-readable tags. While the inner workings are complex, implementing it is simple thanks to modern tools. In this tutorial, we’ll show you how to implement image tagging in Angular 19 using Froala v4.4 — a powerful WYSIWYG editor with built-in Filestack integration.
Key Takeaways
- Image tagging is a useful tool for getting the general features of an image
- You can use image tagging for organizing images, optimizing targeted ads, adding tags to online products, and more
- Froala has built-in image tagging due to its native integration with Filestack
- As of v4.4, Froala now supports Angular 19
- Use image tagging synchronously or through Filestack Workflows
Some Real-world Applications for Image Tagging
Image tagging has become more prominent nowadays. You can go to your favorite online store, social media platform, or travel app, and you’ll see some form of it. You can even encounter it at work. Here are a few ways that people use image tagging in their applications:
- Digital Asset Management: When organizing a business’s digital assets, they can use image tagging to sort photos not just by metadata but also according to image features. For example, businesses can automatically put together logos, screen designs, and advertising photos by getting and processing tags from images.
- Product Classification: Image tagging proves valuable for e-commerce applications by efficiently sorting product images by their respective categories. For instance, when an online store uploads an image of a laptop, it will receive tags like “electronics,” “laptop,” and “technology.” This practice consequently improves product recommendations for users.
- Advertising and Marketing: Images are of great assistance to marketers. With image tagging, they can automatically detect what a user’s interests are, such as “ramen” or “skiing.” This helps them make their advertisements more relevant to users.
- Travel and Tourism: Notice how travel applications always seem to recommend places that are similar to the ones you book? Chances are they’re using tags for that, and with image tagging, this practice can improve. Based on the images that your favorite destination or establishment uploads, the app can recommend destinations with similar tags.
Now that we have some ideas on where to apply image tagging, how about we show you how you can actually implement it?
Implementing Image Tagging in Angular 19 Using Froala HTML Editor Software
To implement image tagging, all you’ll need are your favorite tech stack, a file handling tool, and a solid HTML editor software. In this case, we’ll be using Angular 19 and Froala Editor v4.4. This latest version of Froala supports Angular 19, allowing for more speed, simplification, security, and compatibility.
Moreover, it also natively includes Filestack, an advanced file uploader and transformation tool with image tagging features. With these tools, image tagging turns into a significantly easier task.
Project Setup
To get started, open your CLI and navigate to your preferred directory. Create a new Angular app by running:
ng new filestack-integration
In this case, I used “filestack-integration” as the project name. After creating the project, navigate to its root directory and install Froala’s Angular SDK. This allows you to integrate Froala into your Angular application. Let’s run the following command:
npm install angular-froala-wysiwyg --save
Now, open your project using your preferred code editor. Go to the “angular.json” file and replace the “styles” and “scripts” options with:
"styles": [
     "src/styles.css",
     "node_modules/froala-editor/css/froala_editor.pkgd.min.css",
     "node_modules/froala-editor/css/froala_style.min.css"
],
"scripts": [
     "node_modules/froala-editor/js/froala_editor.pkgd.min.js"
]
This loads the necessary stylesheets and JS for Froala Editor. Next, let’s create the editor itself.
Creating the WYSIWYG Editor
In your CLI, type and run:
ng generate component editor
This generates a new component called EditorComponent, which is where we’ll configure the editor and create the necessary functions for image tagging. After creating this component, open your “editor.component.ts” file and replace the code with this:
import { Component } from '@angular/core';
import { FroalaEditorModule, FroalaViewModule } from 'angular-froala-wysiwyg';
import 'froala-editor/js/plugins.pkgd.min.js';

@Component({
  selector: 'app-editor',
  standalone: true,
  imports: [FroalaEditorModule, FroalaViewModule],
  templateUrl: './editor.component.html',
  styleUrl: './editor.component.css'
})
export class EditorComponent {

}
The next step involves opening “index.html” and including the required Filestack files for uploading and transforming (and, in our case, tagging) images:
<link rel="stylesheet" href="https://static.filestackapi.com/transforms-ui/2.x.x/transforms.css" />

<script src="https://static.filestackapi.com/filestack-js/3.32.0/filestack.min.js"></script>

<script src="https://static.filestackapi.com/filestack-drag-and-drop-js/1.1.1/filestack-drag-and-drop.min.js"></script>

<script src="https://static.filestackapi.com/transforms-ui/2.x.x/transforms.umd.min.js"></script>
Now, let’s go back to our “editor.component.ts” file and configure the necessary editor options and events.
export class EditorComponent{
  private froalaEditor: any;
  public editorContent = "Filestack is a simple file uploader & powerful APIs to upload, transform & deliver any file into your app.";
  public options: Object = {
    heightMin: 300,
    filestackOptions: {
      uploadToFilestackOnly: true,
      filestackAPI: "YourFilestackAPIKey", // replace this with your actual key
      pickerOptions: {
        accept: ['image/*'], // accept only images of any type from the local file system
        fromSources: ['local_file_system']
      }
    },
    events: {
      'filestack.uploadedToFilestack': (event: any) => {
        const fileHandle = event.filesUploaded[0].handle; // get the handle of the uploaded file after every successful upload
        this.performImageTagging(fileHandle); // let's type this in for now; we'll get to the actual function later
        console.log("Callback is triggered for upload event",)
      },
      'filestack.filestackPickerOpened': () => {
        console.log("Callback is triggered for open picker event",)
      },
      'filestack.filestackPickerClosed': () => {
        console.log("Callback is triggered for close picker event",)
      },
      'filestack.uploadFailedToFilestack': () => {
        console.log("Callback is triggered for upload failure",)
      },
    },
  };
}
When configuring your Froala Editor, remember to include your Filestack API key (which you can obtain by creating a free Filestack account). You can also change the picker options to whatever you like, but for this demo, which only requires images, we’ll go with just images.
Next, we’ll start scanning images after they’re uploaded, so call your function (in this case, “performImageTagging“) from the “filestack.uploadedToFilestack” event. This function will take the file handle as a parameter.
Once you’re done with this, open “editor.component.html” and include the following code:
<div [froalaEditor]="options" [(froalaModel)]="editorContent"></div>
<div id="image-tagging-results"></div> <!-- This will hold the image tags -->
This creates the elements for both the editor and the container for the tags. The next step is to display Froala on the main page of the application. To do so, open “app.component.ts” and import EditorComponent:
import { Component } from '@angular/core';
import { CommonModule } from '@angular/common';
import { RouterOutlet } from '@angular/router';
import { EditorComponent } from './editor/editor.component';

@Component({
  selector: 'app-root',
  standalone: true,
  imports: [CommonModule, RouterOutlet, EditorComponent],
  templateUrl: './app.component.html',
  styleUrl: './app.component.css'
})
export class AppComponent {
  title = 'filestack-integration';
}
And on your “app.component.html” file, replace the initial code with:
<!-- * * * * * * * * * * * * * * * * * * * * * * * * * * * * * * * -->
<!-- * * * * * * * * * * * The content below * * * * * * * * * * * -->
<!-- * * * * * * * * * * is only a placeholder * * * * * * * * * * -->
<!-- * * * * * * * * * * and can be replaced.  * * * * * * * * * * -->
<!-- * * * * * * * * * * * * * * * * * * * * * * * * * * * * * * * -->
<!-- * * * * * * * * * Delete the template below * * * * * * * * * -->
<!-- * * * * * * * to get started with your project! * * * * * * * -->
<!-- * * * * * * * * * * * * * * * * * * * * * * * * * * * * * * * -->

<style>
  :host {
    --bright-blue: oklch(51.01% 0.274 263.83);
    --electric-violet: oklch(53.18% 0.28 296.97);
    --french-violet: oklch(47.66% 0.246 305.88);
    --vivid-pink: oklch(69.02% 0.277 332.77);
    --hot-red: oklch(61.42% 0.238 15.34);
    --orange-red: oklch(63.32% 0.24 31.68);

    --gray-900: oklch(19.37% 0.006 300.98);
    --gray-700: oklch(36.98% 0.014 302.71);
    --gray-400: oklch(70.9% 0.015 304.04);

    --red-to-pink-to-purple-vertical-gradient: linear-gradient(180deg,
        var(--orange-red) 0%,
        var(--vivid-pink) 50%,
        var(--electric-violet) 100%);

    --red-to-pink-to-purple-horizontal-gradient: linear-gradient(90deg,
        var(--orange-red) 0%,
        var(--vivid-pink) 50%,
        var(--electric-violet) 100%);

    --pill-accent: var(--bright-blue);

    font-family: "Inter", -apple-system, BlinkMacSystemFont, "Segoe UI", Roboto,
      Helvetica, Arial, sans-serif, "Apple Color Emoji", "Segoe UI Emoji",
      "Segoe UI Symbol";
    box-sizing: border-box;
    -webkit-font-smoothing: antialiased;
    -moz-osx-font-smoothing: grayscale;
  }

  h1 {
    font-size: 3.125rem;
    color: var(--gray-900);
    font-weight: 500;
    line-height: 100%;
    letter-spacing: -0.125rem;
    margin: 0;
    font-family: "Inter Tight", -apple-system, BlinkMacSystemFont, "Segoe UI", Roboto,
      Helvetica, Arial, sans-serif, "Apple Color Emoji", "Segoe UI Emoji",
      "Segoe UI Symbol";
  }

  p {
    margin: 0;
    color: var(--gray-700);
  }

  main {
    width: 100%;
    min-height: 100%;
    display: flex;
    justify-content: center;
    align-items: center;
    padding: 1rem;
    box-sizing: inherit;
    position: relative;
  }


  .content {
    display: flex;
    justify-content: space-around;
    width: 100%;
    max-width: 700px;
    margin-bottom: 3rem;
  }

  .content p {
    margin-top: 1.5rem;
  }


  @media screen and (max-width: 650px) {
    .content {
      flex-direction: column;
      width: max-content;
    }

  }
</style>

<main class="main">
  <div class="content">
    <div class="">

      <app-editor></app-editor>
    </div>

  </div>
</main>

<!-- * * * * * * * * * * * * * * * * * * * * * * * * * * * * * * * * -->
<!-- * * * * * * * * * * * The content above * * * * * * * * * * * * -->
<!-- * * * * * * * * * * is only a placeholder * * * * * * * * * * * -->
<!-- * * * * * * * * * * and can be replaced.  * * * * * * * * * * * -->
<!-- * * * * * * * * * * * * * * * * * * * * * * * * * * * * * * * * -->
<!-- * * * * * * * * * * End of Placeholder  * * * * * * * * * * * * -->
<!-- * * * * * * * * * * * * * * * * * * * * * * * * * * * * * * * * -->


<router-outlet></router-outlet>
Now, you have a custom component that includes both Froala Editor and Filestack. You can already use this for robust file transformations and rich text editing, but we still need image tagging, right? Don’t worry, it won’t be long before you have it in your application as well.
Froala WYSIWYG editor options
Here is the summary of the Froala WYSIWYG editor options we used here:
| Option | Description | Example Value |
| heightMin | Minimum height of the editor window | 300 |
| filestackOptions | Object containing Filestack integration settings | { uploadToFilestackOnly: true, filestackAPI: “YourFilestackAPIKey” } |
| pickerOptions | Configures the file picker for allowed sources and file types | { accept: [‘image/*’], fromSources: [‘local_file_system’] } |
| events | Event handlers for upload success, failure, picker open/close | ‘filestack.uploadedToFilestack’: callback |
Adding Image Tagging Features to the WYSIWYG Editor
Go back to your “editor.component.ts” file and add the following functions to your EditorComponent:
// Perform image tagging after file upload
  async performImageTagging(fileHandle: string) {
    const policy = 'YourFilestackPolicy';
    const signature = 'YourFilestackSignature';
    const imageTaggingURL = `https://cdn.filestackcontent.com/security=p:${policy},s:${signature}/tags/${fileHandle}`;

    try {
      const result = await this.scanImage(imageTaggingURL);
      const tags = result?.tags?.auto;

      if (tags) {
        // Loop through the keys and values of tags dynamically
        let tagsList = '';
        for (const [key, value] of Object.entries(tags)) {
          // Create a displayable list item for each tag
          tagsList += `<li>${key}: ${value}</li>`;
        }

        console.log("Image tagging result:", result);
        const resultElement = document.getElementById('image-tagging-results');
        if (resultElement) {
          resultElement.innerHTML = `<p>Image Tagging Analysis:</p><ul>${tagsList}</ul>`;
        }
        else {
          console.error("Element for displaying tags not found.");
        }
      }
      else {
        console.error("Empty tags.");
      }
    }
    catch (error) {
        console.error("Error during image tagging:", error);
    }
  }

  // Function to call the Filestack Image Tagging API
  async scanImage(url: string) {
    const response = await fetch(url);
    if (!response.ok) {
      throw new Error("Failed to fetch image tagging results.");
    }
    const data = await response.json();
    return data;
}
These two functions deal with calling Filestack’s image tagging API and then looping through the results to create a displayable list of tags. This starts when the successful upload event calls the function “performImageTagging” (yes, the one from earlier).
First, you’ll create a URL that includes the Filestack CDN, your generated Filestack policy and signature, the API keyword “/tags/“, and the file handle.
Afterwards, we’ll call the function “scanImage” to fetch a result from the generated URL.
Once we get a result, we’ll create a list of tags using the generated key-value pair from the image tagging API and display it. And that’s it for the coding part.
Filestack image tagging API parameters
The table below shows a summary of the Filestack image tagging API parameters we used in the above example.
| Parameter | Description | Example |
| policy | Base64-encoded JSON policy defining allowed actions and expiry | Generated server-side |
| signature | HMAC-SHA256 signature tied to policy and secret | Generated server-side |
| fileHandle | Unique identifier for uploaded file | abc123xyz |
| /tags/ | API endpoint for image tagging | https://cdn.filestackcontent.com/security=p:…,s:…/tags/{fileHandle} |
Now, let’s test out our application!
Running the Application
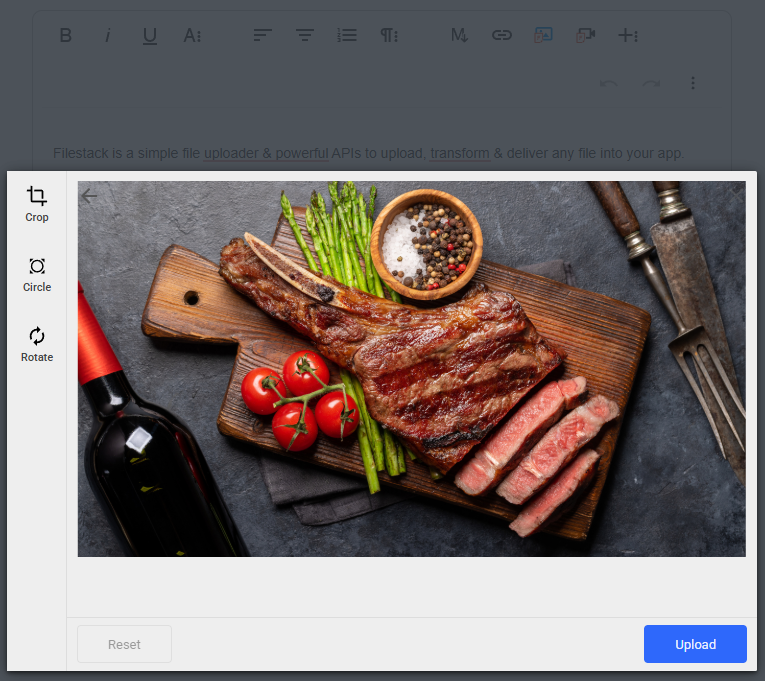
Type “ng serve” into your CLI and hit the enter key to run the application, which you can view at “http://localhost:4200” in your browser. You should see the Froala Editor and the sample text inside. Try uploading an image using the Filestack upload icon on the toolbar. In this case, I uploaded an image of a steak.
After picking an image, click the upload button, and you’ll see it added to the editor. More importantly, you’ll see that the container for the tags now has some values.
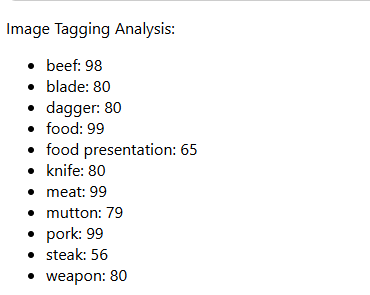 According to Filestack’s image tagging API, the steak image is very certain that it detects food, beef, and meat. Additionally, it also generated keywords related to the knife in the image. Now, let’s try uploading an image of a snowy ski slope.
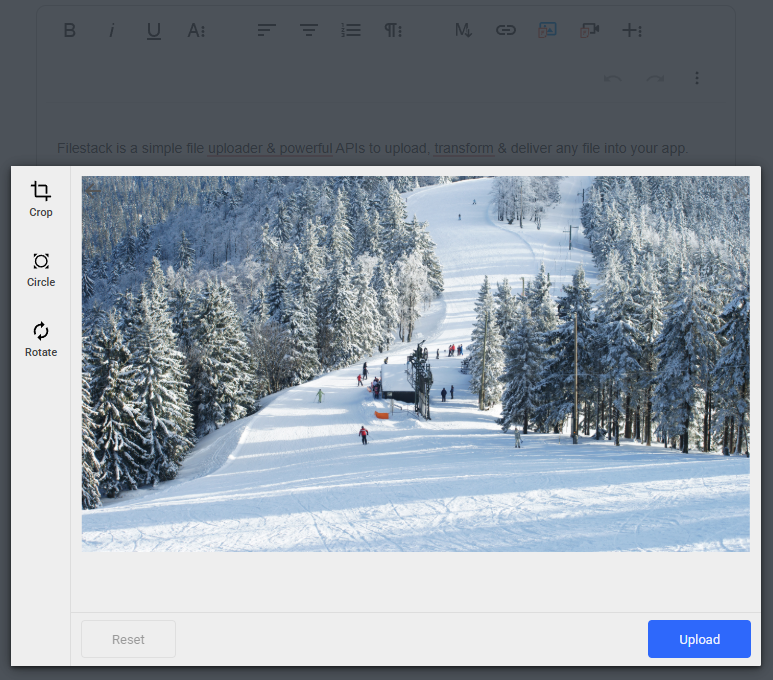
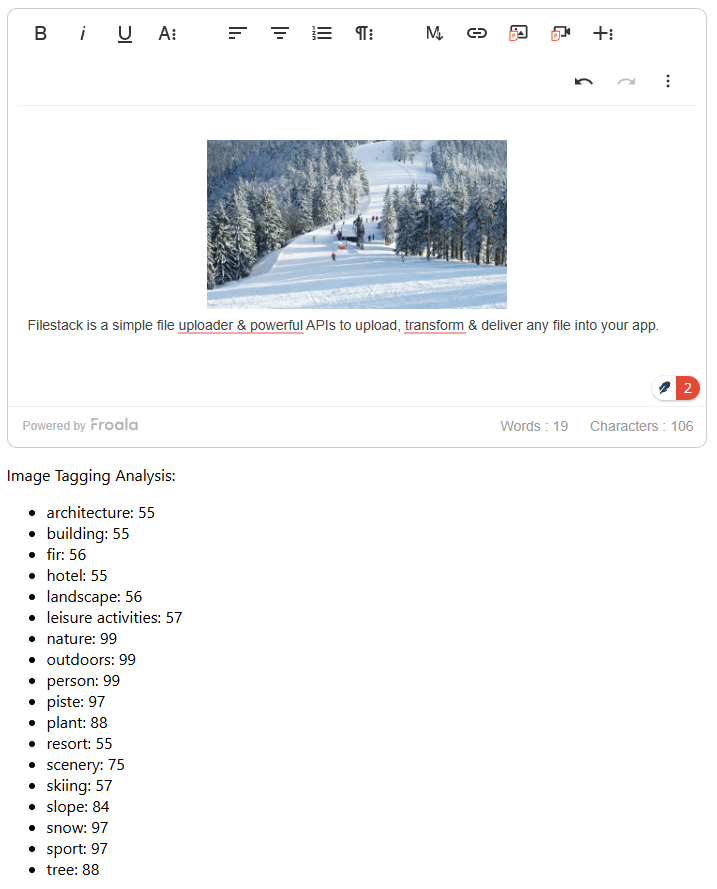
After uploading the image, the API generated some very relevant tags, such as nature, outdoors, person (since people are in the image), piste (which is exactly what the image is), and plant (because of the trees). It generated a few other words, but in your implementation, you could limit the tags to just the top three or five keywords for better precision.
And there we have it: a reliable image tagging solution using Angular 19 and Froala 4.4. From here, you can do various other modifications, including combining it with other Filestack processes, such as NSFW checking, image sentiment analysis, image enhancement, and more.
Additionally, consider using Filestack Workflows to further simplify the implementation and task chaining process. We may be done with this example, but there are various other things we can do with the tools that we have.
You can explore more in the Filestack and Froala documentation below:
Conclusion
In this tutorial, we discussed image tagging, its applications in the real world, and how you can implement it with ease. As image tagging will continue its status as an important feature in the future, the need for knowledge to implement it will keep increasing.
Thankfully, with tools like Angular, Froala WYSIWYG editor, and Filestack, implementing image tagging has become much easier. It is, of course, technology’s job to make us more efficient, and it is ours to create things that will contribute to people in some way.
Get your Filestack API here for free.
Watch the image tagging demo in action.


No comment yet, add your voice below!