


A Step-by-Step Guide to Checking Image and Video Safety Using an HTML Editor Software

As developers, we all want users to feel safe or productive in the applications that we make. This leads to implementing policies that prevent users from seeing or uploading explicit, violent, or distracting content. As a result, content moderation is more important than ever.
Thankfully, accomplishing complex tasks has become much easier using automation, advanced file uploaders, and even DeepSeek API integrations. For instance, in this article, you’ll implement automated SFW (safe for work) checks using HTML editor software and Filestack Workflows. Let’s get to it!
Key Takeaways
- Ensure uploaded content is appropriate to maintain a professional and comfortable environment.
- Automatically identify safe-for-work (SFW) content to handle multiple files efficiently.
- Implement automated content safety checks with Froala Editor and Filestack Workflows.
- Connect Filestack Workflows to a webhook endpoint to get instant feedback on file status.
- Combine different file processing tasks in your Workflow.
Why Is Content Safety Important in Web Applications?
User-generated content can significantly impact the tone and reputation of your application. Unsafe or inappropriate content can potentially alienate, harm, or repulse users. This in turn can cause huge problems for your brand’s image, leading to users’ distrust or disgust.

In general, you’ll want to scan whether there’s anything unsafe in user content. And in social media and B2B and family-friendly platforms, implementing content safety checking becomes more imperative. By automating SFW checking, you:
- Maintain a positive user experience.
- Reduce human or manual content moderation.
- Increase application scalability in moderating content.
Now, let’s check out the tools that we’ll need for integrating automated safety checking.
What You Need to Implement Automated Safety Checking
Alongside HTML editor software, you’ll also need a file management solution where users can upload files. This will also take care of checking the safety of content. Finally, in this use case, you’ll use a webhook endpoint to receive information about content safety from the upload.
Froala Editor
An HTML editor software, which you’ll use to upload images. Since v4.3, it has natively supported Filestack, making transforming and processing files even easier using the editor. Here, you’ll integrate it into a React application.
Filestack
A complete file management solution that handles everything file-related, from uploads and transformations to storage and even automation. In this example, you’ll use Filestack Workflows to automate SFW checking. Make sure that you have access to Filestack’s Webhooks, SFW checking, and Workflows features.
A workflow executes a set of tasks and logic wired up after an upload to enforce business processes and automate ingest. After configuring a workflow, you can call it with a single reference in your code. And since workflows are asynchronous, you also need to configure a webhook.
Webhook Endpoint
A webhook is similar to an API in the sense that it allows data exchange. However, it’s different in that it automatically triggers after specific events, unlike APIs that require the client to request data first. In your applications, you can configure webhooks to receive information from Filestack using Node.js or PHP.
For simplicity, you can use Beeceptor to receive JSON payloads from Filestack for every file upload.
How to Automatically Check Content Safety Using HTML Editor Software
Checking content safety using HTML editor software is usually a straightforward process. It actually involves little coding and only a bit of setup. Follow the steps below to find out exactly how you can implement this.
Set up Your Filestack Workflow
To get started, log into your Filestack dashboard and navigate to the “Workflows” tab. Create a new workflow (in this case, “SFWChecker”). Add a task and select “sfw” from the list. Name the task “sfw_result.” In the webhook later on, you should see the same task name in the JSON payload.
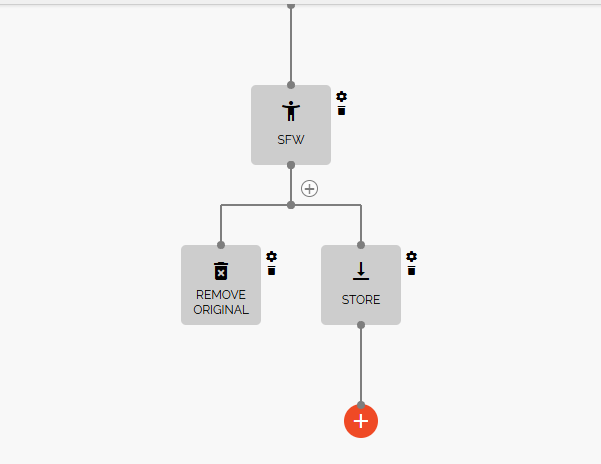
Afterwards, create 2 events below the SFW task: store and remove. For the “store” task, click the “Add new condition” button. Next, check that the job will only store the image if the value of “sfw” is true. Do the reverse (don’t store if “sfw” is false) for the “remove” task. Here’s how your workflow should look:
Create Your Endpoint
After setting up your workflow, create your endpoint using the back-end scripting language or framework of your choice. In this case, you can use Beeceptor to test out the SFW checker workflow.
Configure Your Application Webhooks
Once you have the link to your endpoint, go to “Configuration > Webhooks” on the Filestack dashboard. Afterwards, paste your webhook link to the input field and set the dropdown beside it to “Workflow.” Add your webhook, and you should see it among the list of webhooks.
Integrate Your Workflow into Froala HTML Editor Software
Open your React project, create a component called “FroalaComponent.jsx,” and paste the following code to configure Froala Editor:
import React, { useEffect, useState } from 'react';
import 'froala-editor/css/froala_style.min.css';
import 'froala-editor/css/froala_editor.pkgd.min.css';
import FroalaEditorComponent from 'react-froala-wysiwyg';
import 'froala-editor/js/plugins.pkgd.min.js';
import configData from './config.js';

function FroalaComponent() {
    const [tags, setTags] = useState([]);
    const config = {
        filestackOptions: {
            uploadToFilestackOnly: true,
            filestackAPI: configData.filestackAPI,
            pickerOptions: {
              accept: ['image/*'],
              fromSources: ['local_file_system'],
              storeTo: {
                  workflows: ["YourWorkflowIDHere"]
              }
            },
        },
        events: {
            'filestack.uploadedToFilestack': function (response) {
                console.log(response.filesUploaded[0]);
            }
        },
        heightMin: 500,
        width: 1000
    };

    useEffect(() => {
        const filestackScript1 = document.createElement('script');
        filestackScript1.src = 'https://static.filestackapi.com/filestack-js/3.32.0/filestack.min.js';
        filestackScript1.async = true;
        document.body.appendChild(filestackScript1);

        const filestackScript2 = document.createElement('script');
        filestackScript2.src = 'https://static.filestackapi.com/filestack-drag-and-drop-js/1.1.1/filestack-drag-and-drop.min.js';
        filestackScript2.async = true;
        document.body.appendChild(filestackScript2);

        const filestackScript3 = document.createElement('script');
        filestackScript3.src = 'https://static.filestackapi.com/transforms-ui/2.x.x/transforms.umd.min.js';
        filestackScript3.async = true;
        document.body.appendChild(filestackScript3);

        const filestackStylesheet = document.createElement('link');
        filestackStylesheet.rel = 'stylesheet';
        filestackStylesheet.href = 'https://static.filestackapi.com/transforms-ui/2.x.x/transforms.css';
        document.head.appendChild(filestackStylesheet);

        return () => {
            document.body.removeChild(filestackScript1);
            document.body.removeChild(filestackScript2);
            document.body.removeChild(filestackScript3);
            document.head.removeChild(filestackStylesheet);
        };
    }, []);

    return (
        <div>
            <div className="editor">
                <FroalaEditorComponent tag='textarea' config={config} />
            </div>
        </div>
    );
}

export default FroalaComponent;
This is your standard Froala implementation in React. What you should focus on, however, is the “storeTo” option, which contains the workflow ID that we created earlier.
No matter the tasks and conditions you have in your workflow, you only need a single line to call it in your application. Pretty cool, right? Now, you can include this component in your App.js and run the application.
Note: Ensure that you keep all API keys secure on the server (e.g., .env files). Furthermore, always validate webhook signatures to confirm authenticity and integrity.
Seeing the Automated SFW Checker in Action
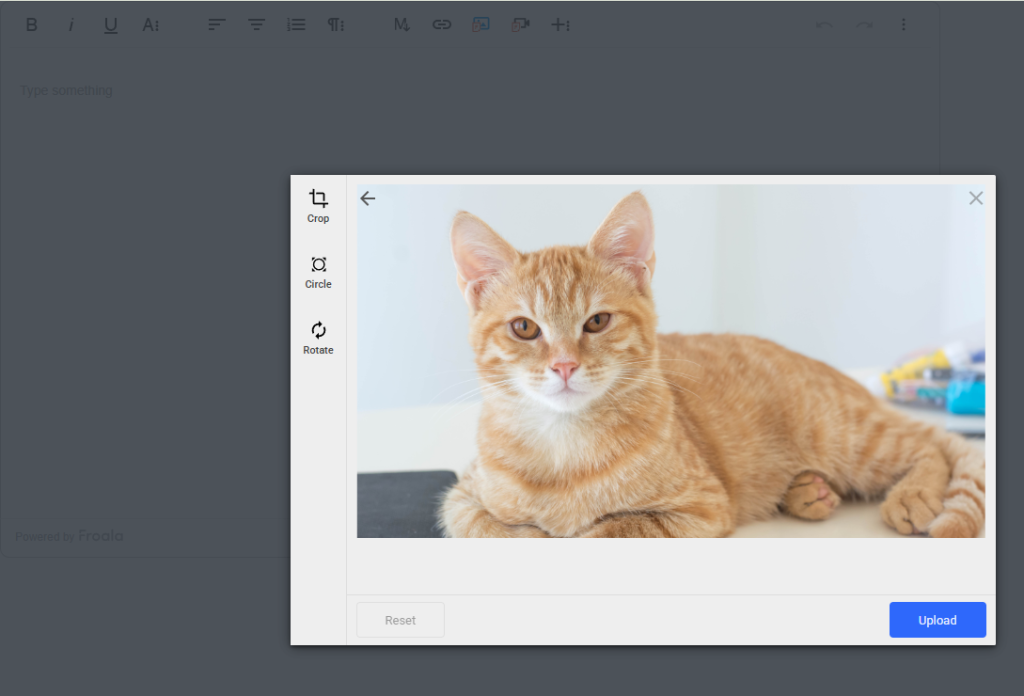
Firstly, select the Filestack picker icon and upload your image.
After uploading an image, go to your browser console and look for the result from the log command:
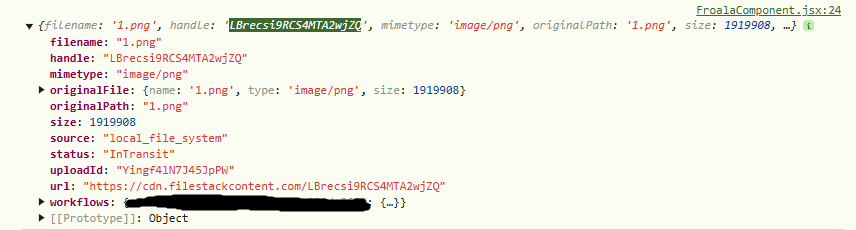
Take note of the file handle and the filename. You should see the same things when you go to the Beeceptor dashboard.
Moreover, notice how you can see the “workflows” property of the result object. This contains the workflow ID of our set of tasks. Now, the task information should appear on Beeceptor, so let’s check that out:
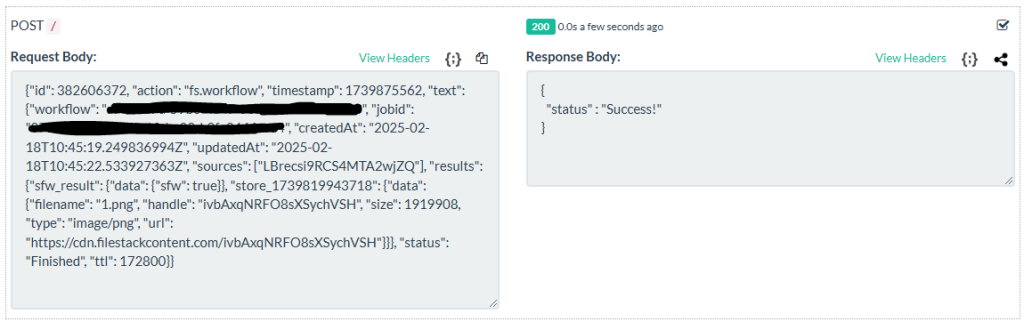
On Beeceptor, click on the latest request and expand it. In this case, the filename and handle remained the same. Additionally, you can see that there’s a new handle, which emerged from the “store” part of your workflow. Most importantly, you now have the “sfw_result” result from your workflow earlier.
And within it lies the “{data: {“sfw”: true}}” result from the content safety checker. This means that the image from earlier is safe for work. If you chain additional tasks to your workflow, you’ll see more results on the webhook.
Ensure Safe Content in Your HTML Editor Software Today
Automating content safety checks enhances your application’s reliability and trustworthiness. With tools like Filestack and Froala, you can efficiently manage content without much manual intervention.
Now that you’ve built a solid and easy content safety checker into your HTML editor software, you can start experimenting some more! For instance, why not add some tasks like red-eye removal, image tagging, or sentiment analysis into the workflow mix?


No comment yet, add your voice below!