


Auto-Formatting Features That Save Time

Formatting is not always as fast as most content editors expect or want. Adjusting colors, fixing alignment, or reapplying font styles could break users’ flow and distract from real content creation. Over time, these small, repetitive actions accumulate and reduce productivity. The solution? Auto formatting.
It refers to a feature that applies consistent formatting rules automatically, ensuring text and layout stay neat without constant manual correction. In a WYSIWYG editor, auto formatting means your users’ content always appears with the correct styles. This allows them to focus on writing and creating content instead of tweaking.
In this article, you’ll learn about some common auto-formatting features that save time and maintain design consistency. You’ll also explore a practical way to automate formatting in a WYSIWYG editor using custom plugins and events. Let’s get started!
Key Takeaways
- Auto formatting reduces repetitive formatting tasks and ensures design consistency.
- WYSIWYG editors support extensibility through customizable events and plugins.
- Automating text styles, colors, alignment, and more improves workflow, consistency, and readability.
- Auto formatting is useful across CMS platforms, corporate websites, and data entry tools.
- Developers can start with custom plugins, then explore AI-assisted auto formatting for smarter styling decisions.
What Is Auto Formatting in WYSIWYG Editors?
Auto formatting means allowing the editor to handle repetitive styling decisions on your behalf in usually just one button click. It helps ensure that all text follows predefined design rules, such as consistent line spacing, font size, and color. Additionally, it means that users shouldn’t have to apply these styles manually every time they edit.
For example, let’s say you have an internal communication tool in which users send memos for the company to see. And in the tool, every memo has to have the company’s branding. This means the font styles, sizes, and colors should appear consistent.
Furthermore, the company’s standards on headings, paragraphs, and text alignment must hold for every message. For users, having to check all these standards while also writing could prove exhausting. So, the developers of the tool can add a custom “auto format” button, which takes care of every company-specific formatting.
In WYSIWYG editors, this feature helps make rich text editing intuitive and fast while reducing the workload for your users. Moreover, through modular architecture, developers can build auto-formatting features on top of editors using APIs or custom plugins. This allows event-based automation, which are actions that trigger automatically when certain events occur in the editor.
What Are Some Common Auto-Formatting Features?
Auto formatting usually begins with font-related adjustments like bold, italic, or underlined text, but modern editors extend far beyond that. They can automatically align paragraphs, adjust font sizes, maintain consistent heading levels, or enforce color palettes aligned with company branding. This saves editors from repetitive formatting each time they add new content.
Consistent Typography and Style Application
Auto formatting helps maintain consistent typography, or the design and arrangement of text. For instance, a rule might automatically convert all subheadings to a standard H3 size, apply a secondary color, and ensure uniform line spacing. This helps achieve a cohesive-looking end result even when multiple users are collaborating on the same document.
In a modern WYSIWYG HTML editor, developers can build a custom plugin or connect to an editor event that applies the rule instantly. For example, when a user selects text and clicks an “auto format” button, the plugin could:
- Set the font to Roboto
- Set font size of paragraph text to 12px
- Adjust heading sizes to a consistent hierarchy
Automatic Alignment and Spacing Adjustments
Auto formatting can also manage paragraph alignment and spacing. For example, when users press an “auto format” button, the editor could automatically add appropriate spacing and apply predefined paragraph margins. It can also deal with aligning all paragraphs left, right, or center based on the editor’s configuration.
Like in typography, developers can attach event listeners to trigger paragraph spacing and alignments automatically in the WYSIWYG editor. These refer to code that responds to user actions like “on text insert” or “on paste.” This approach keeps layout uniform even when users have varying editing habits.
Color Schemes and Branding Enforcement

For organizations that adhere to strict branding standards, auto formatting can help maintain color and design consistency. The system can automatically apply a brand’s colors to headings, buttons, and links. It can also help prevent users from choosing unapproved shades or fonts that break brand identity.
Changing an element’s color (e.g., blue to orange) is a rough example of how auto formatting works for colors. After changing the color, you have the choice to apply the change for all similar elements with the previous color. Since this happens in a single click, this saves plenty of time, especially if you’re working on standardization for branding.
How to Implement Auto Formatting Using Custom Plugins
If you want greater control over how users can automatically format their content, you can implement it through custom plugins. WYSIWYG editor plugins act as add-ons that extend an editor’s core functionality. By defining custom logic, such as “apply default font family on content paste,” you can automate almost any formatting task.
In this section, you’ll learn how this works in practice. This example uses Froala as the WYSIWYG editor, as it allows for custom plugin creation.
Step 1: Load Necessary Files and Create the Editor Container
First, head over to your HTML file and paste the following code:
<!DOCTYPE html>
<html lang="en">

<head>
    <meta charset="UTF-8" />
    <meta http-equiv="X-UA-Compatible" content="IE=edge" />
    <meta name="viewport" content="width=device-width, initial-scale=1.0 " />

    <title>Format Content Automatically with Froala</title>
    <!-- Load Froala Editor CSS files. -->
    <link href="https://cdn.jsdelivr.net/npm/froala-editor@latest/css/froala_editor.pkgd.min.css" rel="stylesheet" type="text/css" />


</head>

<body>
<h1>Auto Formatting in WYSIWYG Editors</h1>
<div id="editor"></div>


<!-- Load Froala Editor JS files. -->
<script type="text/javascript" src="https://cdn.jsdelivr.net/npm/froala-editor@latest/js/froala_editor.pkgd.min.js"></script>
<script src="index.js"></script>

</body>
</html>
This loads the stylesheet and script for Froala Editor. It also creates a div element with the “editor” ID. This is where you can initialize the editor later on.
Step 2: Create the Custom Plugin
Now, in your JS file, insert the following code to create the custom plugin:
// custom plugin
FroalaEditor.PLUGINS.autoFormat = function(editor) {
    return {
        run: function () {
            const doc = new DOMParser().parseFromString(editor.html.get(), 'text/html');
            const brandColor = '#01a4f9';

            // 1. typography and style
            const headings = doc.querySelectorAll('h1, h2, h3');
            headings.forEach(h => {
                h.style.fontFamily = 'Inter, sans-serif';
                h.style.fontWeight = '600';
                h.style.color = brandColor;
                if (h.tagName==='h1') {
                    h.style.fontSize = '2em';
                    h.style.marginBottom = '24px';
                }
                else if (h.tagName==='h2') {
                    h.style.fontSize = '1.6em';
                    h.style.marginBottom = '20px';
                }
                else if (h.tagName==='h3') {
                    h.style.fontSize = '1.3em';
                    h.style.marginBottom = '18px';
                }
            });

            const paragraphs = doc.querySelectorAll('p');
            paragraphs.forEach(p => {
                p.style.fontFamily = 'Roboto, sans-serif';
                p.style.fontSize = '16px';
                p.style.lineHeight = '1.6';
                p.style.textAlign = 'justify';
                p.style.marginBottom = '16px';
                p.style.color = '#333';
            });

            const strongs = doc.querySelectorAll('strong, b');
            strongs.forEach(s => {
                s.style.fontWeight = '600';
            });

            const italics = doc.querySelectorAll('em, i');
            italics.forEach(i => {
                i.style.fontStyle = 'italic';
            });

            // 2. alignment and spacing adjustments
            const lists = doc.querySelectorAll('ul, ol');
            lists.forEach(list => {
                list.style.margin = '16px 0 16px 24px';
                list.style.lineHeight = '1.6';
            });

            const blockquotes = doc.querySelectorAll('blockquote');
            blockquotes.forEach(bq => {
                bq.style.margin = '20px 0';
                bq.style.padding = '10px 20px';
                bq.style.borderLeft = `4px solid ${brandColor}`;
                bq.style.color = '#555';
                bq.style.fontStyle = 'italic';
            });

            // 3. color schemes and branding enforcement
            const links = doc.querySelectorAll('a');
            links.forEach(a => {
                a.style.color = brandColor;
                a.style.textDecoration = 'none';
                a.style.fontWeight = '500';
            });

            // Clean up multiple <br> tags or empty elements
            doc.querySelectorAll('br + br, p:empty').forEach(el => el.remove());

            // Update the editor
            editor.html.set(doc.body.innerHTML);
            editor.events.focus();
            editor.html.insert('<p><em>Auto formatting applied using custom branding style.</em></p>');
        }
    };
};
This takes care of the auto-formatting process by defining a set of rules depending on the type of element it detects in the editing space. For example, headings will have the “brandColor” style applied to them. Their font family, font weight, and margin will also change.
The same thing goes for paragraphs. Their color will turn into a lighter black, and “Roboto” will replace their current font.
This code also adjusts spacing and alignment for lists and blockquotes, making everything appear neater and less cramped. Lastly, the code applies the “brandColor” style to all links.
Once all rules are set, clean up all <br> or empty elements and update the editor’s contents.
So that the user will see and use the custom plugin in the editor, you have to define and register a button for it. Do this by adding the code below:
// define and register the button
FroalaEditor.DefineIcon('autoFormat', { NAME: 'star', SVG_KEY: 'star' });
FroalaEditor.RegisterCommand('autoFormat', {
    title: 'Auto Format',
    icon: 'autoFormat',
    plugin: 'autoFormat',
    callback: function () {
        this.autoFormat.run();
    }
});
This defines an icon called “autoFormat” with the “star” icon. Afterwards, the code registers that button and links it to the “autoFormat” plugin and function.
Step 4: Initialize and Configure the Editor
You’re almost there! Finally, create the editor instance and set its properties:
new FroalaEditor('#editor', {
    toolbarButtons: [
        'bold', 'italic', 'underline', 'paragraphFormat', '|', 'autoFormat'
    ],
    pluginsEnabled: ['paragraphFormat', 'autoFormat'],
    heightMin: 750,
    width: 750
});
The code above initializes the editor in the <div> element you created earlier. Notice how the “autoFormat” button now resides under the “toolbarButtons” property as well as the list of enabled plugins. Now, when you run the app, you’ll see the editor along with the custom plugin button.
Running the App
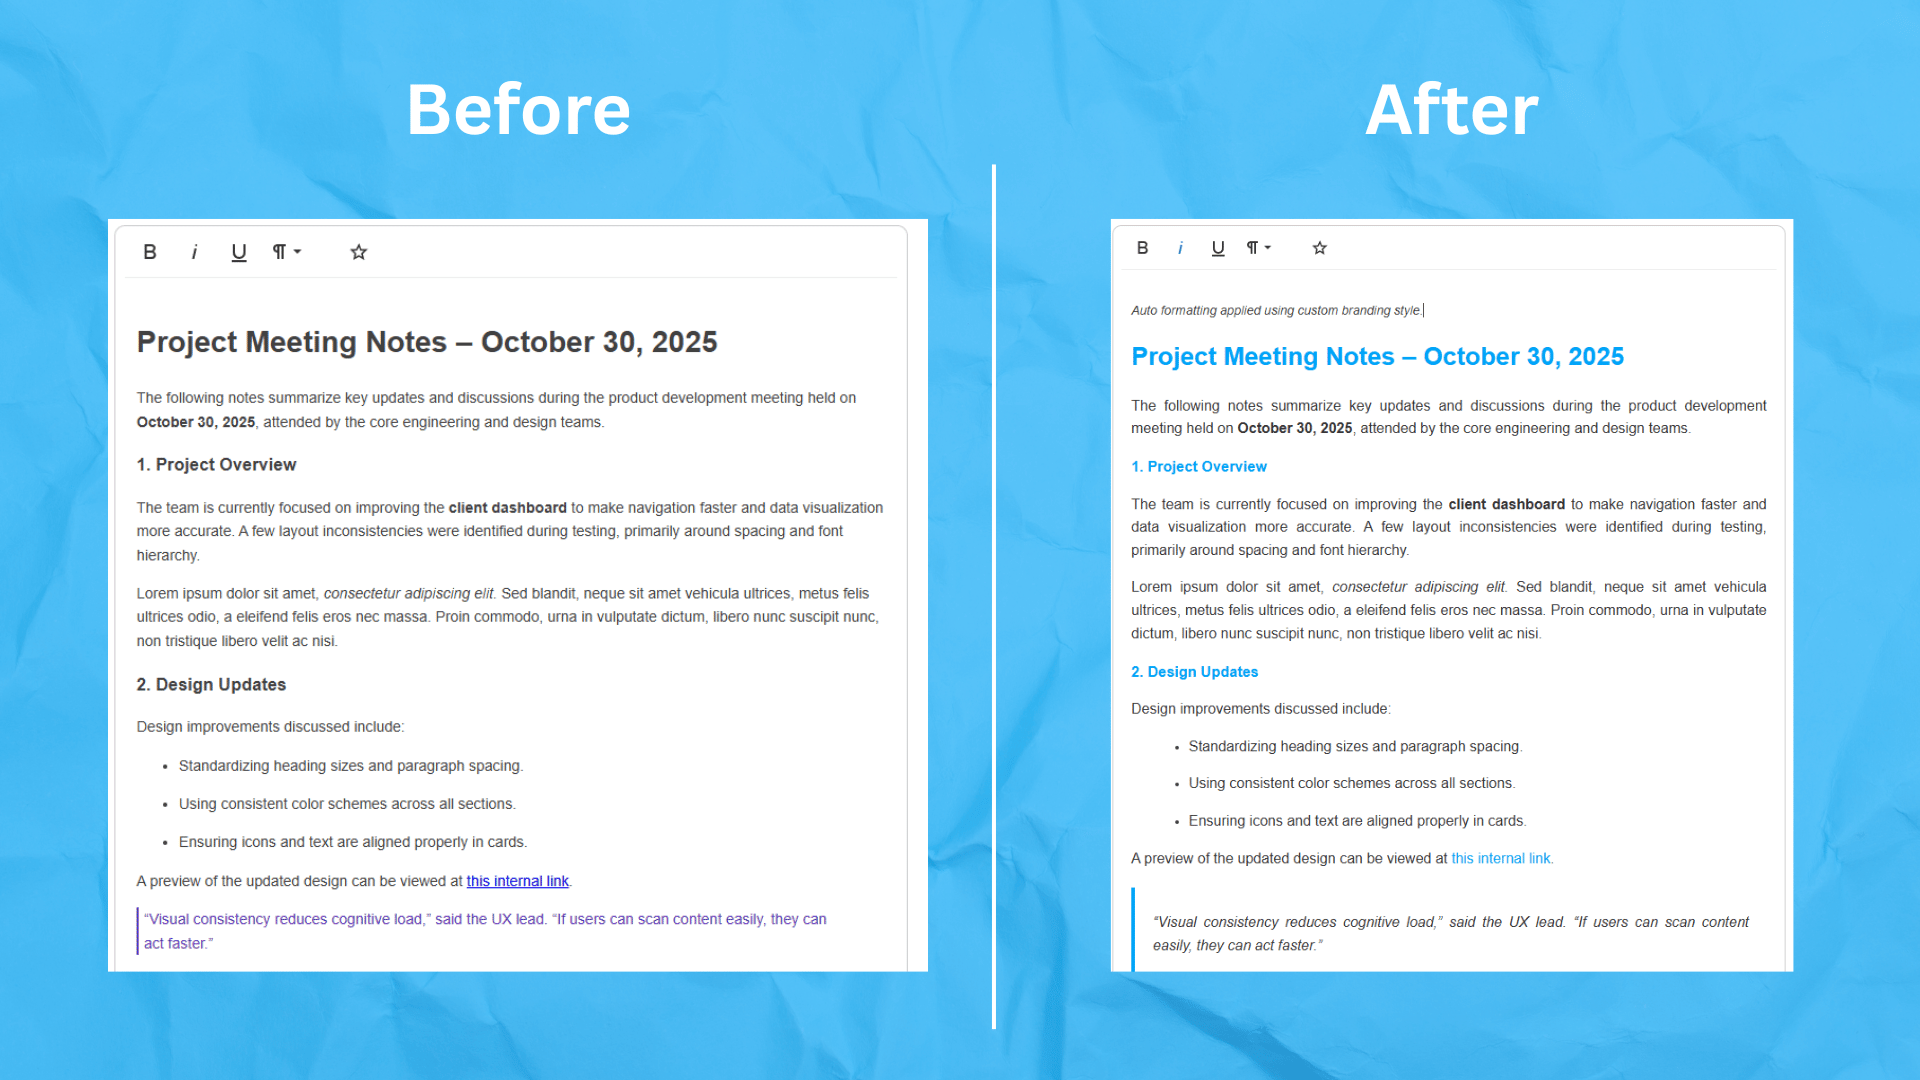
You’re all set. Run the app using your browser, paste some formatted text, and click the “Auto Format” button. You’ll experience something like this:

In this demo, the headings turned light blue, which is the brand color specified earlier, along with the links. The font also appears rounder, larger, and generally more readable. Finally, the quotation and the lists also seem a lot less cramped now.
Tip: Before you move on, consider checking this auto-formatting demo on GitHub.
Benefits of Auto Formatting
Auto formatting contributes significantly to workflow efficiency. At the very least, it provides a way for users to avoid manually formatting content every time they edit. When implemented well, it helps maintain consistency, reduce human errors, improve readability, and speed up editing.
- Time Savings: Of course, this is the main benefit of formatting automation. It reduces the number of manual actions needed to make content look consistent. Instead of repeatedly clicking toolbar buttons to adjust styles, editors can let automation handle routine formatting.
- Content Consistency: With defined formatting rules, all contributors produce content that looks cohesive. This is especially useful for large teams working within shared templates or brand guidelines.
- Readability: By applying uniform styles, such as larger font sizes for headings and sufficient spacing for paragraphs, content becomes easier to scan and read.
- User Error Reduction: With automatic formatting, users can more confidently publish consistent and presentable content. By minimizing the number of times a user has to click the usual formatting buttons, you allow fewer avenues to make mistakes.
Tip: You can combine auto formatting with real-time validation rules. For instance, when a user pastes text with disallowed colors, the editor can immediately revert it to the approved color palette.
Auto Formatting Use Cases
Auto formatting shines in environments where content volume is high and consistency matters.
- Blogs or CMS: Auto formatting ensures that every post follows the same visual hierarchy and spacing. Even if authors forget to apply certain styles, the system can enforce the styles automatically before publication. This helps keep site design cohesive without manual cleanup.
- Corporate Websites or Tools: In professional environments, branding rules are typically strict. Auto formatting helps guarantee that font colors, button styles, and paragraph alignments follow the company’s branding guide. This could reduce back-and-forth revisions between editors and designers.
- Form-Based Content Editors: In feedback forms or WYSIWYG editor-powered survey platforms, auto formatting enforces structure. It automatically formats lists, quotations, and headings for clarity, allowing users to focus on input without worrying about presentation.
These use cases show how formatting automation has become a practical requirement for teams that value quality and consistency.
Conclusion
Auto formatting transforms how organizations and teams approach content creation. It automates repetitive tasks like setting fonts, colors, and alignments, letting editors focus more on delivering their message. This can also prove useful if you’re building or using a text-to-HTML editor, where maintaining clean, consistent markup is crucial.
Through WYSIWYG editor customization, developers can implement predictable formatting rules that reduce friction and improve workflow. Plugins and event-driven automation make these systems powerful and adaptable to different needs.
Looking ahead, you can (and should) experiment with creating your own custom plugins for different auto-formatting tasks. Furthermore, experiment with AI-assisted auto formatting, like integrating DeepSeek or similar models into your editor. These tools can analyze context and apply intelligent styling suggestions that go beyond simple rule-based plugin systems.
Whether through plugins or AI, your goal should remain the same. Help users create content faster, maintain consistency, and deliver a polished user experience without wasting much time on manual formatting. Happy coding!


No comment yet, add your voice below!